Then I got nervous!
I love to sew and create! It is just that perfectionist side of me that always makes me worry about the little imperfections that show up in my work. Especially when I give it to others or am doing a project for someone else. Yes, most times, they will never notice, but the craftsman always has the most critical eye!
I have never done a tutorial, so I took a lot of pictures and will do my best. Please let me know if you need more details or some clarification.
Here goes!!
I purchase a package of cloth diapers to use. I do wash all my diapers and any fabric before I sew anything. You will want to start out with it flat. See the defined middle section? I usually cover the entire padded part with fabric. The padded part is actually a bit wider than the stitching you see.


Cut a strip of fabric that is at least 1" wider and about the same length as the diaper.

Fold the fabric under so that it lines up with the padded edge. Do this along both sides, pinning as you go. I am big on pinning because I hate to have my fabric slip as I sew. You will just remove the pins as you sew along the edge.


Here is where we get into options! I have never completed a burp cloth with this trim, but I wanted to show you how you could do it because I noticed someone else did this on the ones they make. This is quilt binding single-fold bias tape that I slipped onto the folded edge. You would continue this all the way along the edge, pinning as you go.

If I were sewing this on, it would look like this when I got done. Can you picture it?

Many times, I simply use a fancier stitch along the edges. It looks nice and can be less of a problem around the baby's face. I control the size and look of the stitch with my stitch knobs on my machine. I have a pretty basic machine, so the stitches could get fancier the more options you have on your machine.

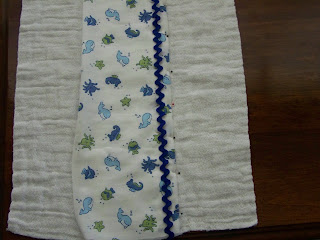
Today, I am showing you what it looks like with rick rack trim on the edges. With rick rack, I go ahead and pin my fabric on and simply guide my rick rack as it goes under the needle. It is pretty easy to control.


Here is what it looks like. Just ignore where I got off center in one spot! See, not perfect!!

Next, I like to trim the end edges just along the padded portion. I tried to show a close up so the you can see that I am just trimming the bulkier part in the middle. You will understand more once you have your hands on the burp cloth. Also, go back to picture 2, and you can sorta see the bulkier middle part. It seems to make putting on the edge trim a little easier. It probably does not matter so much here as I am using the large blanket binding, but it leaves a nicer look when using the quilt binding I use most of the time.

I typically use this to trim the end edges of most of my burp cloths. I have tried the single fold before, but to me, it is just not wide enough to make easy sewing and a clean look. The double-fold looks better!

I did not have enough to trim this burp cloth with the blue, but I will try to show you how to do it, then finish up with my blanket binding that I am using today. The how-to is really the same.
Open the binding and slip it over the edge. These two pics are just to make sure you understand where to place it.


With the diaper face up, place the trim along the face up edge. You will want to leave about 1" extra on both side edges to create the fold.

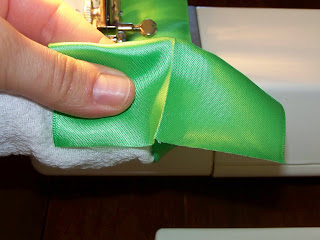
Fold the end down and towards the back of the diaper.

See the crease on the trim above? Fold that trim so that the front and back end edges are covered with trim.

This the back view of the end edge. It creates an envelope at the corners!

It will basically look like this once you sew it on. Don't forget to do your backstitching when you are starting and ending at the corners! Also, I don't usually pin the end edge binding. I just hold it on/around the edge as I sew along.

Today, I am doing the ends with the blanket binding. It is the same steps. Just a warning though, this binding is slippery and makes you want to say bad words as you are trying to get it secured for sewing.


As you get near the end when sewing on the binding, you should have about this much (maybe a tad less) left at the end in order to do the same fold/tuck/fold maneuver!


Here are a couple of views of the finished product/s.


I love doing these and can usually whip one out from start to finish in about 15-20 minutes. Well, that is IF I am uninterrupted! :)
Maybe soon, I will show you a few more things I have done and even try my hand at a few more tutorials.
Happy Sewing!
Stacey
3 comments:
you are so talented... and how patient of you to stop and take a picture after each step!
THANK YOU for this!!
I kept thinking I'd come over yesterday to look for it, but instead I was obsessively checking my email and Jan's blog for news every 15 minutes, about the baby. Of course, 15 minutes after leaving the house in the evening, she emailed. :)
We are THRILLED and her story is AMAZING. We are blessed - thank you so much for sharing in our joy!
I hope to get to these very soon - and I'll let you know when I do. I'll probably post pics and link back (assuming nothing happens in the meantime... it's so hard to get to the "crafty" stuff... life has a way of interrupting, it seems!).
They are so cute!
by the way,
I'm going to put a link to this in my sidebar... under "feathering my nest," or whatever it's called over there. Very, very cute!
Post a Comment